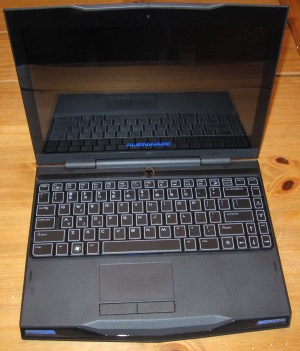
 After playing with -er- using the m11x for over a week, I can safely say that this is one of the best 11″ notebooks ever created. I still have more testing to complete because multiple styled battery tests are not only boring – they are time consuming. However, I feel like I have enough good data -beyond my first impressions– to help those in the market for a portable yet powerful notebook to make a better decision. I’ve included comparisons to my desktop, Adamo, and netbook to give you a good feel for how this pocket rocket performs. Below are the specs for my machine:
- 1.3GHz Intel SU7300 (800MHz FSB, 3MB Cache) overclockable to 1066MHz FSB (1.73GHz)
- Nvidia GeForce GT 335M Discrete Graphics (1GB GDDR3) with switchable Intel GMA 4500MHD integrated graphics
- 4GB PC3-8500 DDR3 (2 x 2GB)
- 250GB 7200RPM SATA Hard Drive
- 11.6″ WXGA WideHD LED Backlit display (1366×768)
- Windows 7 Home Premium 64bit
- 802.11b/g/n, 10/100 LAN
- 3-in-1 card reader
- 8-Cell Li-ion 64WH battery, 65W Power Supply
- Dimensions: 11.25″ x 9.19″ x 1.29″
- Weight: 4.48lbs
First off, let’s address the 3D Marks issue. Engadget reported a “3DMark06 score [of] 5593. That’s significantly lower than the ‘over 6,100’ Alienware claims…” What they missed however was the ability to overclock the m11x in the bios. A super simple procedure of F2-ing to reach the bios and changing the”OverClock” setting (under Advanced) from “Disabled” to “Enabled” handles overclocking the CPU from 1.3Ghz to 1.73Ghz. This 33% speed increase is quite noticeable and is required to hit (and exceed) Dell’s claimed 06 marks. Note: using the overclock option almost ensures the fan will be active in Intel graphics mode. Using the GPU will kick the fan on as well, but you already knew that going into any gaming laptop.
|
3D Marks 06 |
| C2D 1.3 Ghz Intel |
674 |
| C2D 1.73 Ghz Intel |
737 |
| C2D 1.3 Ghz Nvidia |
5605 |
| C2D 1.73 Ghz Nvidia |
6429 |
Real world gaming is always the most grueling part of any review, but I suffered through it for you. ;) This thing can actually play Crysis at native resolution. Stock CPU, it can handle the low settings without problems at 1355×768 and looks quite nice doing it. Overclocking allows a bit more eye candy but not enough to enable full medium settings. Less ridiculously intensive games do much better at native resolution:
- Unreal Tournament runs fine at default (high) settings.
- Far Cry 2 can be played at medium settings when overclocked.
- Call of Duty 2 can be played at maximum settings which includes an in game 4x AA and generally see between 50-80 FPS stock or 60-90 FPS overclocked.
- The original Call of Duty is old enough that it can’t support the native wide screen res and forces you to drop back to 1024×768. With max setting and nHancer set 4×4 AA and 16x AF you generally get 70-200 FPS without overclocking but intense action with large explosions can cause a dip down to 30 FPS at these extreme settings.
The overclocking is noticeable in CPU intensive tasks such as video encoding or calculating prime numbers. I ran wPrime several times after a reboot and took the best time.
|
wPrime 32M in Seconds |
| i7 Core 3.21Ghz (Desktop) |
8.97 |
| m11x C2D 1.73Ghz |
55.7 |
| Adamo C2D 1.4Ghz |
62.4 |
| m11x C2D 1.3Ghz |
68.2 |
| Asus Atom 1.8Ghz |
125.7 |
| Asus Atom 1.6Ghz |
134.4 |
Besides CPU, the other common bottleneck in ultralight computers is often slow hard drives. SSDs can greatly improve this area not only in data transfer speeds but also in access time. A note on the HD Tune results for the m11x that was not overclocked: You will notice the abysmal 7MB/sec minimum. Running the test 3 times I got the spikes of slowness 2 out of the 3 times. Now those spikes will happen on not-completely-sanitized machines when the antivirus or some other background process grabs a few clock cycles or hit’s the disk momentarily. So they are to be expected and should not be inferred to mean bad, bad things. You will notice this very low min did little to change the average speed of the drive compared to the overclocked tests. However, after using the m11x for a week, I can attest to the real world reflection of these results. The m11x for the most part is adequately zippy even considering the fact that I’m accustomed to my ultra-fast workstation. However at times it seems the slower CPU and HD bog down at the same time and performance grinds to a halt for an agonizing second or two. Consider your normal notebook taking a “union break” and pretending it’s a netbook for a few seconds and then returning to normal. Perceived speed is relative but the difference is there even compared against itself. The good news is that I have not yet seen this happen while the CPU is overclocked. Granted you can still overtax the CPU easily with intensive tasks but that is a different matter. OC’d it doesn’t seem to have the odd random slowdown.
|
Min
MB/sec
|
Max
MB/sec
|
Ave
MB/sec
|
Access
in millisec
|
| Intel 2nd Gen SSD |
205.7 |
236.9 |
230.6 |
0.1 |
| Adamo OEM SSD |
97.0 |
137.5 |
103.1 |
0.3 |
| 2x WD Black RAID 0 (speed) |
111.4 |
218.4 |
179.4 |
11.6 |
| WD Green |
40.2 |
100.0 |
73.5 |
13.3 |
| m11x overclocked (7200rpm) |
43.2 |
102.1 |
77.8 |
18.1 |
| m11x (7200rpm) |
7.4 |
101.0 |
76.3 |
19.2 |
| Asus 1000ha |
1.5 |
57.8 |
34.4 |
19.7 |
The chart above is arranged by access time as that often is a more noticeable in how fast a computer feels. Fast transfer rates can help during an a program install or copying a large video file. Fast access time helps everything – especially launching applications where many small files must be brought together to load the program. For this “speed feel” test Gimp was used as it is a big slow program to load which gives a nice worse case test and makes it easier to time with a stop watch. The test was repeated several times and the best time was taken. However only the first launch after each reboot was used as after that cache skews the results (for instance a 2nd launch following the first for both the Adamo and the m11x completed in under 8 seconds when caching all but eliminated hard drive speeds from the equation)
|
Gimp Load Time in Seconds |
| i7 Core Desktop, Intel SSD |
2.8 |
| Adamo C2D 1.4Ghz, OEM SSD |
10.0 |
| m11x C2D 1.73Ghz, 7200 HD |
15.9 |
| m11x C2D 1.3Ghz, 7200 HD |
18.4 |
| Asus Atom 1.8Ghz, 5400 HD |
25.4 |
Even with the faster 7200rpm HD option from Dell and a faster CPU clock speed, the Adamo’s even faster SSD allows for a significantly zippier user experience in Windows. Dell offers an SSD upgrade but unfortunately it’s $570. Now the good news is that it is 256GB which is large as SSDs go. The bad news is that OEM SSD – as seen in my Adamo – don’t tend to live up to the Intel benchmark of SSD speed. However, drives are not that difficult to upgrade, so you can always grab a top performing SSD later and spread out the payment pain a little as well.
Finally battery life. I am still running a battery of tests (heh heh) but I can report that the battery is quite strong. In fact, I believe that the majority of the weight difference between this machine and other “thin and lights” is actually battery weight not the GPU or fans. At the request of my friend Brad over at liliputing, I have run battery tests on HD video use first. Interestingly, the results are almost identical with the Core2Duo running stock or overclocked. Apparently the power draw of the CPU running 60-80% is the same as the CPU being overclocked and running 50-70%. The back light was way too dark at the lowest setting but was quite nice at the 2nd of 8 setting so it was used. Although the differences between the rest of brightness levels does not seem to be very much, especially considering there are only 7 (not dark) settings. Wifi was on and sound was at 30% for this test. As the m11x has no CD/DVD drive, an iTunes HD video seemed a likely candidate for quick and easy video on the go.
- iTunes HD Video Battery Test: 10% warning with 22min windows estimate at 3:32 or 3hr 54min total
- iTunes HD Video Battery Test (OC’d): 10% warning with 24min windows estimate at 3:31 or 3hr 55min total
Or enough time to watch 6 Psych episodes with time to spare. From general use, I can also tell you’ll see 2+ hours of gaming and 6+ hours of light, gentle use. I flesh will out those numbers with further testing and include them in my complete review in the days ahead.


Until then let me just say that the balance between power (CPU & GPU), portability, and battery life in the m11x makes it quite a compelling offering. It is well worth the extra money over the many CULV Thin and Lights out there. As it is alone in it’s offering of an overclocked CPU and a best in class GPU (true mid-range for gamers), it is easy to call this the most powerful 11″ notebook you can buy. For the power user wanting a bit more, an upgrade to an speedy (non OEM) SSD could make this thing really rock at a still cheaper than some price.
 .
.


